How to Draw a Wolf
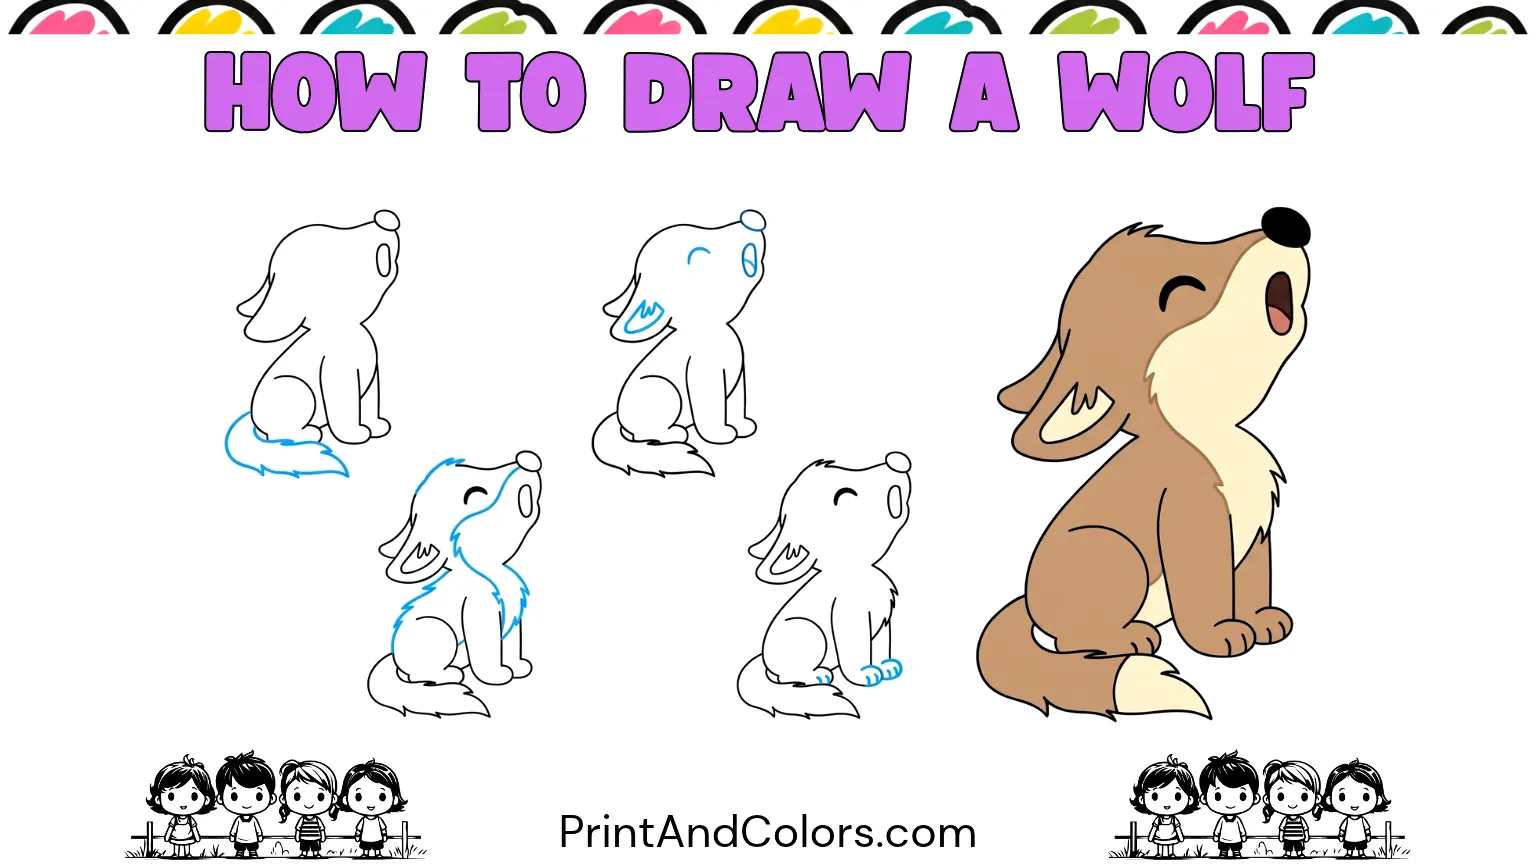
Have you ever thought about drawing a wolf howling at the moon, but didn’t know where to start? Its pointed ears, thick fur, and long snout might seem challenging, but if you break the wolf’s form down into smaller, simple parts, it becomes much easier to draw!
In this easy drawing tutorial, you will learn how to sketch an adorable, seated wolf with its head tilted upward, as if it were howling. We will begin with a circle and an oval, then gradually add the legs, paws, ears, facial features, and a bushy tail.
This easy step guide is perfect for children, beginners, parents, and teachers. You don’t need any special technical skills, all you need is a pencil, some paper, and a bit of imagination.
And the best part? You can practice whenever you like by using our printable PDF and step-by-step drawing book!
Your next masterpiece awaits—try these stunning pages!
What You’ll Need to Draw a Wolf
Before starting your wolf drawing adventure, gather a few simple art supplies:
- Pencil: For sketching the wolf’s basic shapes.
- Eraser: To remove extra lines and fix mistakes.
- Drawing paper: A blank sheet of A4 or letter-size paper.
- Black marker: To outline your finished wolf.
- Crayons or colored pencils: Gray, black, white, and brown are great choices.
- Printable wolf drawing guide: Helpful for following each step.
Drawing time: Approximately 20–30 minutes
Difficulty: Easy
Best for: Kids and beginners
Quick tip: Keep your first pencil lines light. This makes it easier to erase the guide shapes as your wolf takes form.
Step 1: Sketch Two Simple Shapes for Your Wolf

First, draw a large circle near the top of your paper. This will help you establish the placement of the wolf’s head.
Next, draw a long, oval (egg-like) shape below the circle, tilting it slightly to one side. Allow these two shapes to overlap in the area where the neck would be.
These are merely preliminary shapes for the sketch, so don’t worry about making them perfect.
A helpful tip: leave some empty space above the head for the wolf’s snout, and leave some space behind the body to allow room for the tail.
Step 2: Give Your Wolf Two Strong Front Legs
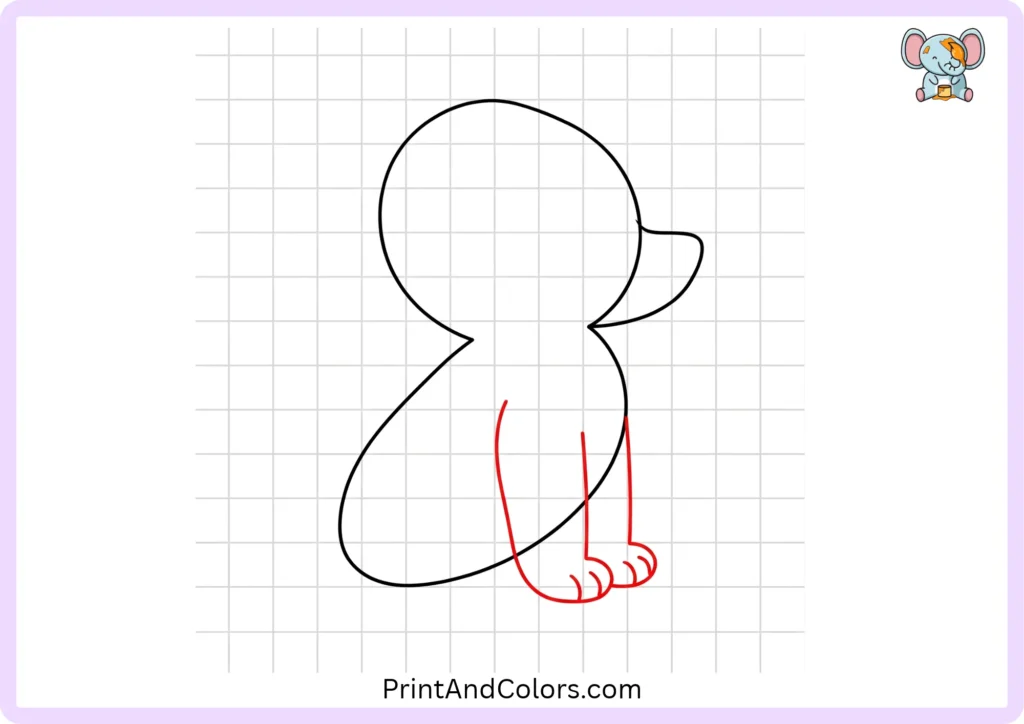
Now it’s time to give your wolf something to stand on!
From the lower front part of the body, draw two long, slightly curved legs extending downwards.
Add a small, rounded paw at the end of each leg. Position one leg directly behind the other to make the drawing look more natural.
Keep the legs fairly straight, as our wolf is sitting upright.
Step 3: Create a Bent Back Leg and a Cozy Paw

A sitting wolf tucks in its hind legs, so we will use a different shape here.
Create a large, curved bulge on the lower, rear part of the oval (egg-shaped) body. This forms the wolf’s muscular hind leg.
Below this, draw a flattened oval shape for the hind paw resting on the ground.
Do not erase the overlapping guidelines just yet. Once the wolf’s outline is complete, we will clean up the remaining unnecessary lines.
Step 4: Turn the Round Head into a Howling Wolf’s Snout
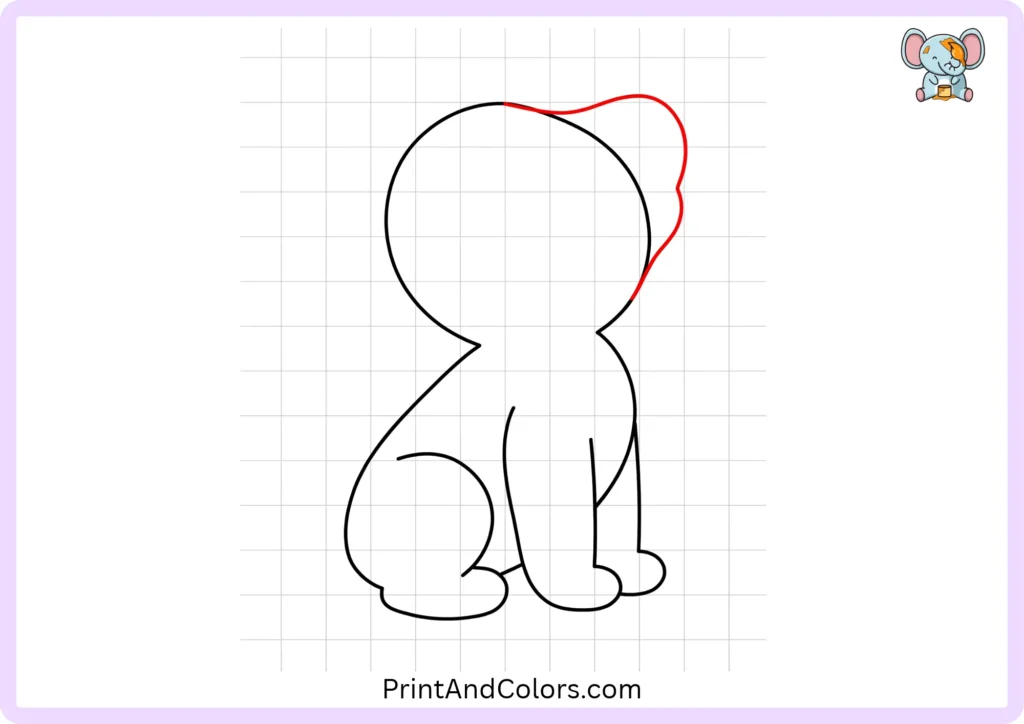
From this point on, your drawing begins to look like a real wolf!
Using the circle for the head as a guide, draw a slightly curved forehead that extends upward and transitions into a long, slender muzzle.
Shape the front of the muzzle and extend its lower line back toward the neck.
An upward-pointing muzzle is crucial, as it creates the iconic silhouette of a howling wolf that we all recognize.
Carefully erase the unnecessary parts of the initial circle you drew.
Step 5: Make Two Pointed Wolf Ears
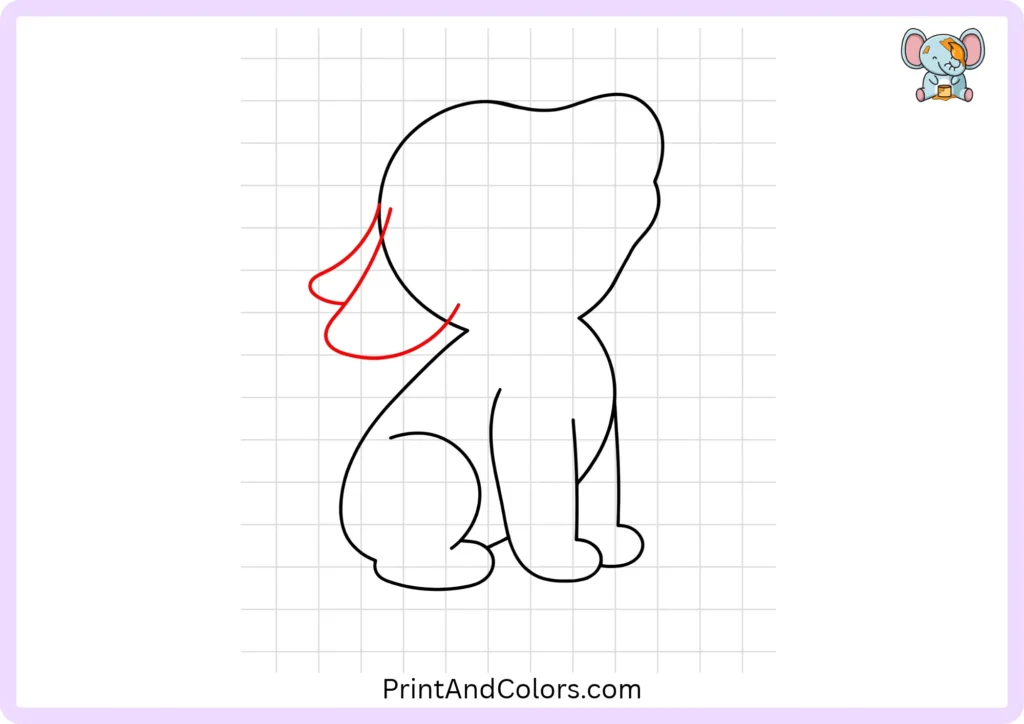
Wolves have upright, triangular ears that help them hear sounds.
Draw a long, pointed ear toward the back of the head. Instead of making it a perfectly straight triangle, give the edges a slight curve.
Draw a second, smaller ear a short distance behind the first one.
A drawing tip: Vary the sizes of the ears to suggest that one is further away. This small detail adds depth to your wolf sketch.
Step 6: Bring Your Wolf to Life with a Face
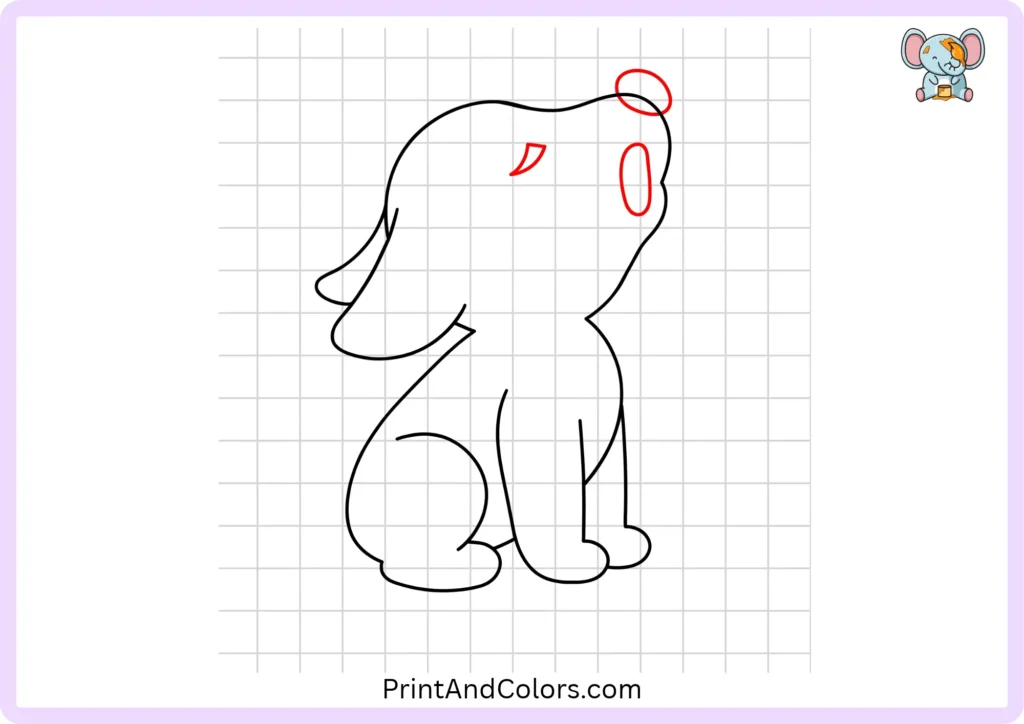
Let’s give your wolf some personality!
At the tip of the upturned snout, draw a small, round or oval-shaped nose. For a closed eye, draw a small, curved line.
Next, draw an elongated oval below the snout to represent an open mouth.
You can shade the inside of the mouth, while leaving a small, lighter-colored area to add some extra detail.
Now, your wolf should look as if it is calling out: “Awoooo!”
Step 7: Add a Big, Fluffy Tail Behind the Body
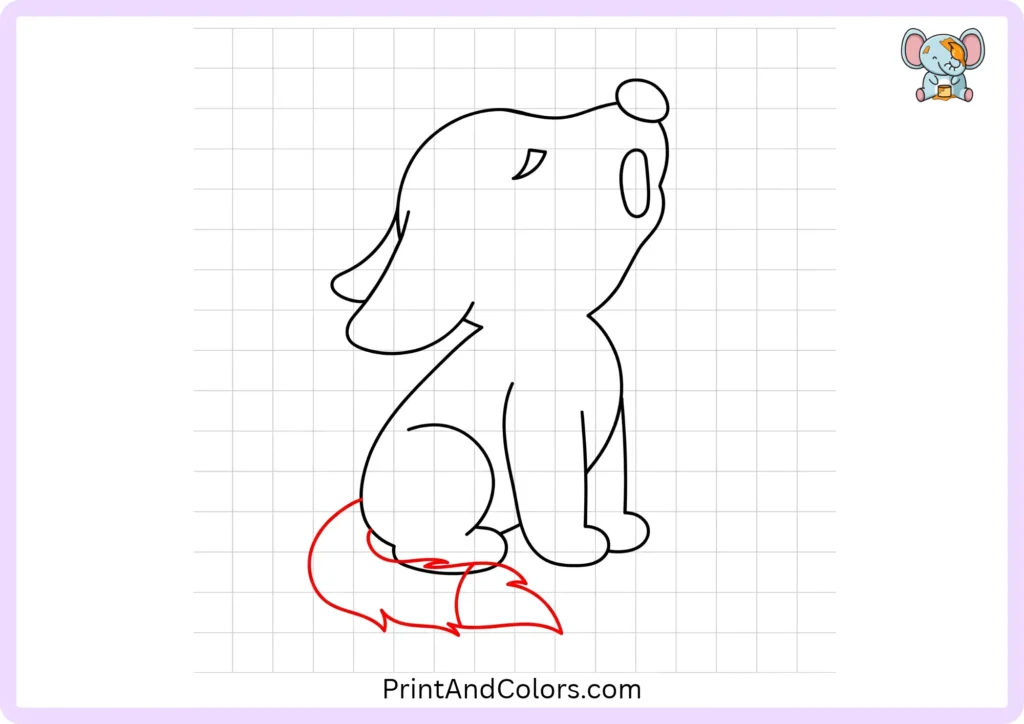
A wolf would look incomplete without its beautiful, bushy tail.
Start near the lower rear part of the body and draw a wide, curved line that extends behind the hind leg.
Extend the tail downwards, then let it trail gently along the ground.
Bring the line back toward the body and finish it in a slightly pointed, fluffy tip.
Make the tail thick rather than thin. Wolves have dense fur, which gives their tails a full, bushy appearance.
Step 8: Draw the Soft Fur Inside the Ear
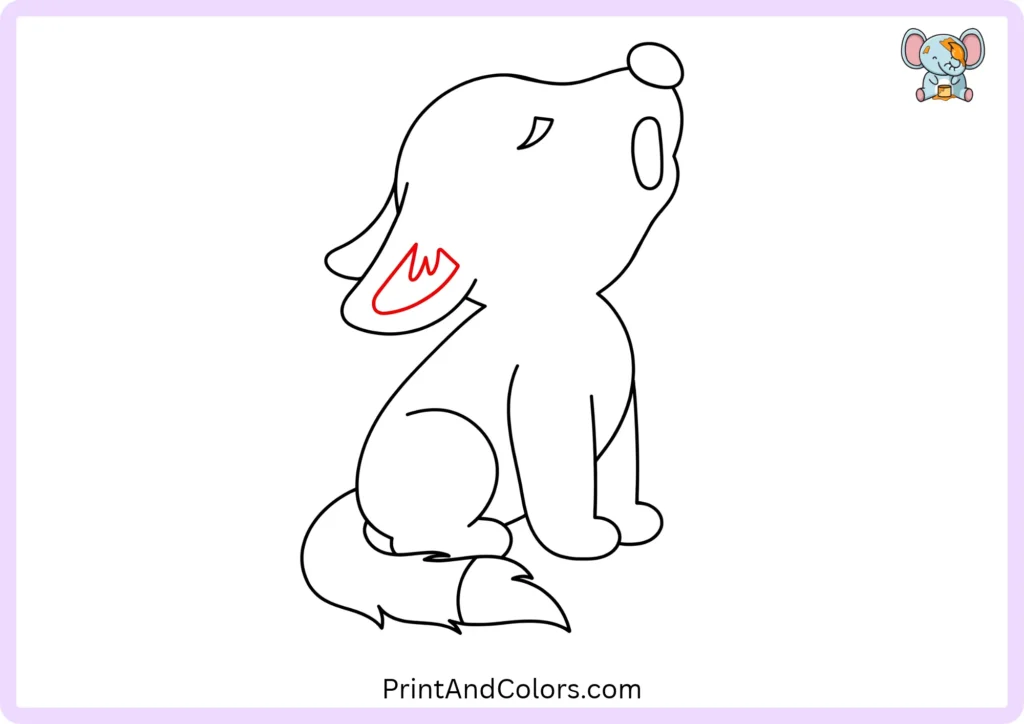
Now, we will add some more details to the ear in the foreground.
Inside the large ear, along its outer edges, draw a small, pointed shape.
Near the base of the ear, add two or three small, zig-zag lines to represent the soft fur found inside the ear.
Keep these lines short and simple. Adding too many lines can make the ear look cluttered or messy, especially if the drawing is small.
Step 9: Make Your Wolf Look Extra Fluffy
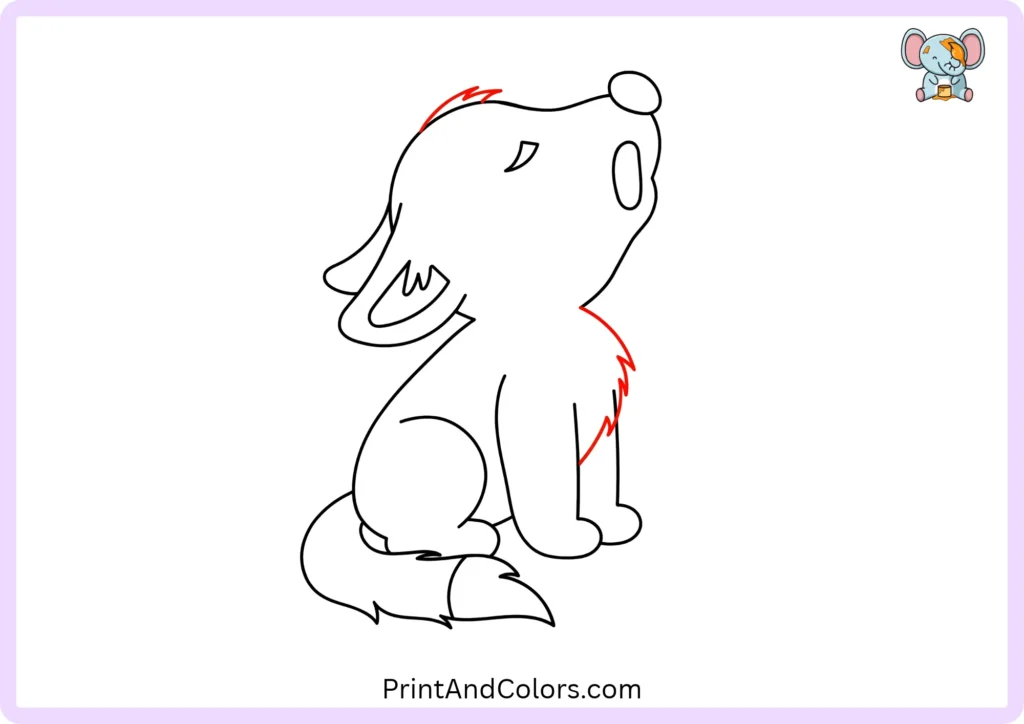
Wolves have thick fur that protects them in cold weather. Let’s depict this dense, soft texture!
Along the forehead, draw some small, pointed tufts of fur.
Around the neck and chest, create small, zigzag lines. Make some tufts slightly longer than others to give the outline a natural appearance.
You can also add some fur markings near the cheeks.
A tip for beginners: Instead of drawing hundreds of individual hairs, create small clusters of pointed lines. This will give your wolf the appearance of having a thick coat of fur, and it won’t be difficult to draw.
Step 10: Finish the Paws with Little Toe Lines
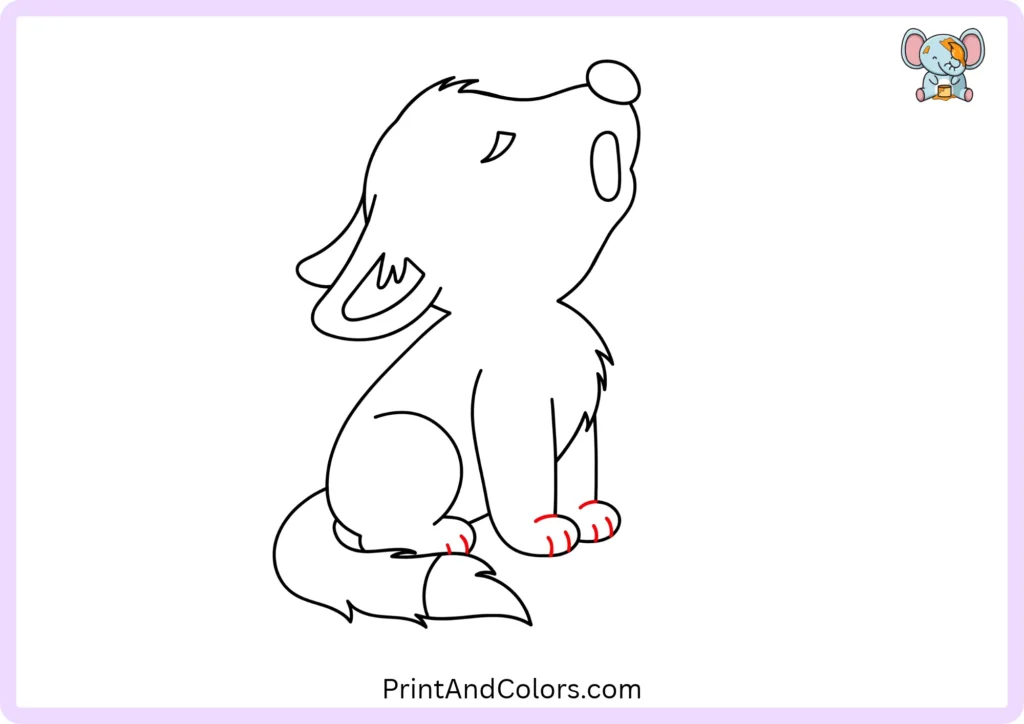
Your wolf is almost complete!
Look at each visible paw and draw two or three small, curved lines to indicate the individual toes.
Instead of drawing long, straight lines, create lines that follow the rounded shape of the paws.
Real wolves typically have four weight-bearing toes on each foot, though you might not be able to see all of them from this angle.
Now, erase any remaining sketch lines, and if you like, you can go over the final outline with a black marker.
Step 11: Color Your Howling Wolf
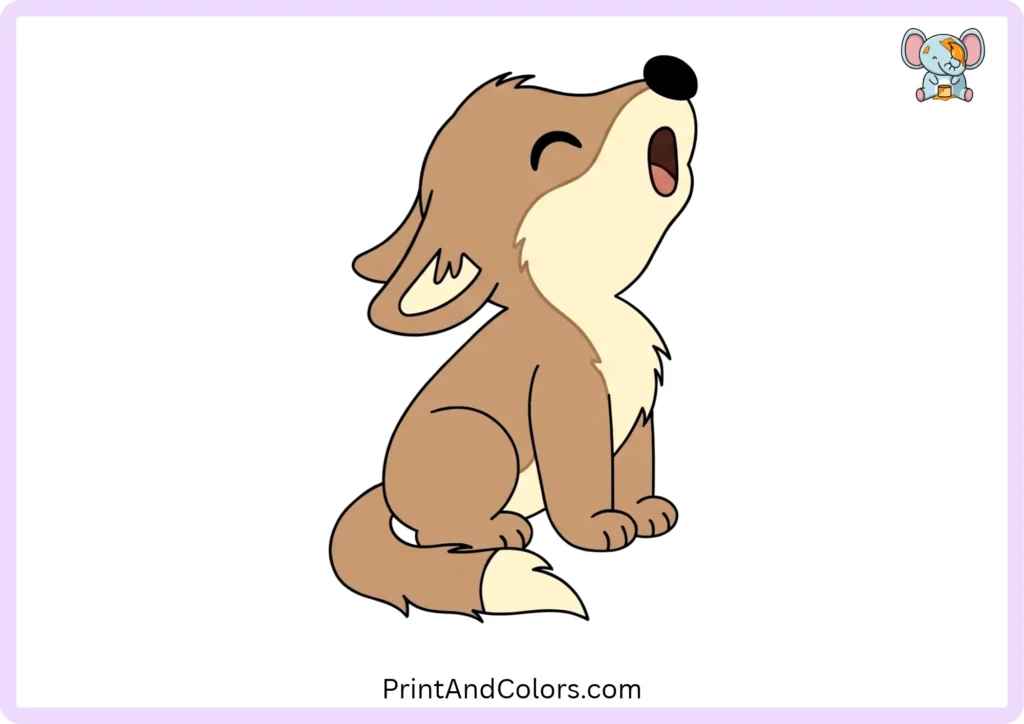
Congratulations! You have completed the sketch of the wolf. Now it’s time to add some color!
For a traditional gray wolf, use a medium gray shade for most of its body. Apply a darker gray along the back, the outer part of the tail, and around the neck.
Use a light gray or cream color for the chest, muzzle, and the insides of the ears. Color the nose black, and keep the muzzle area a bit darker to create a clear contrast.
Want to try something different? How about a snow-white wolf, a dark brown wolf, or even a magical blue wolf?
When you are using your imagination, there is no such thing as a ‘wrong’ color!
Printable Wolf Drawing PDF & Drawing Book
Want to practice your wolf drawing again without looking at a screen?
Our printable wolf drawing PDF book brings the complete easy step tutorial together in one convenient resource.
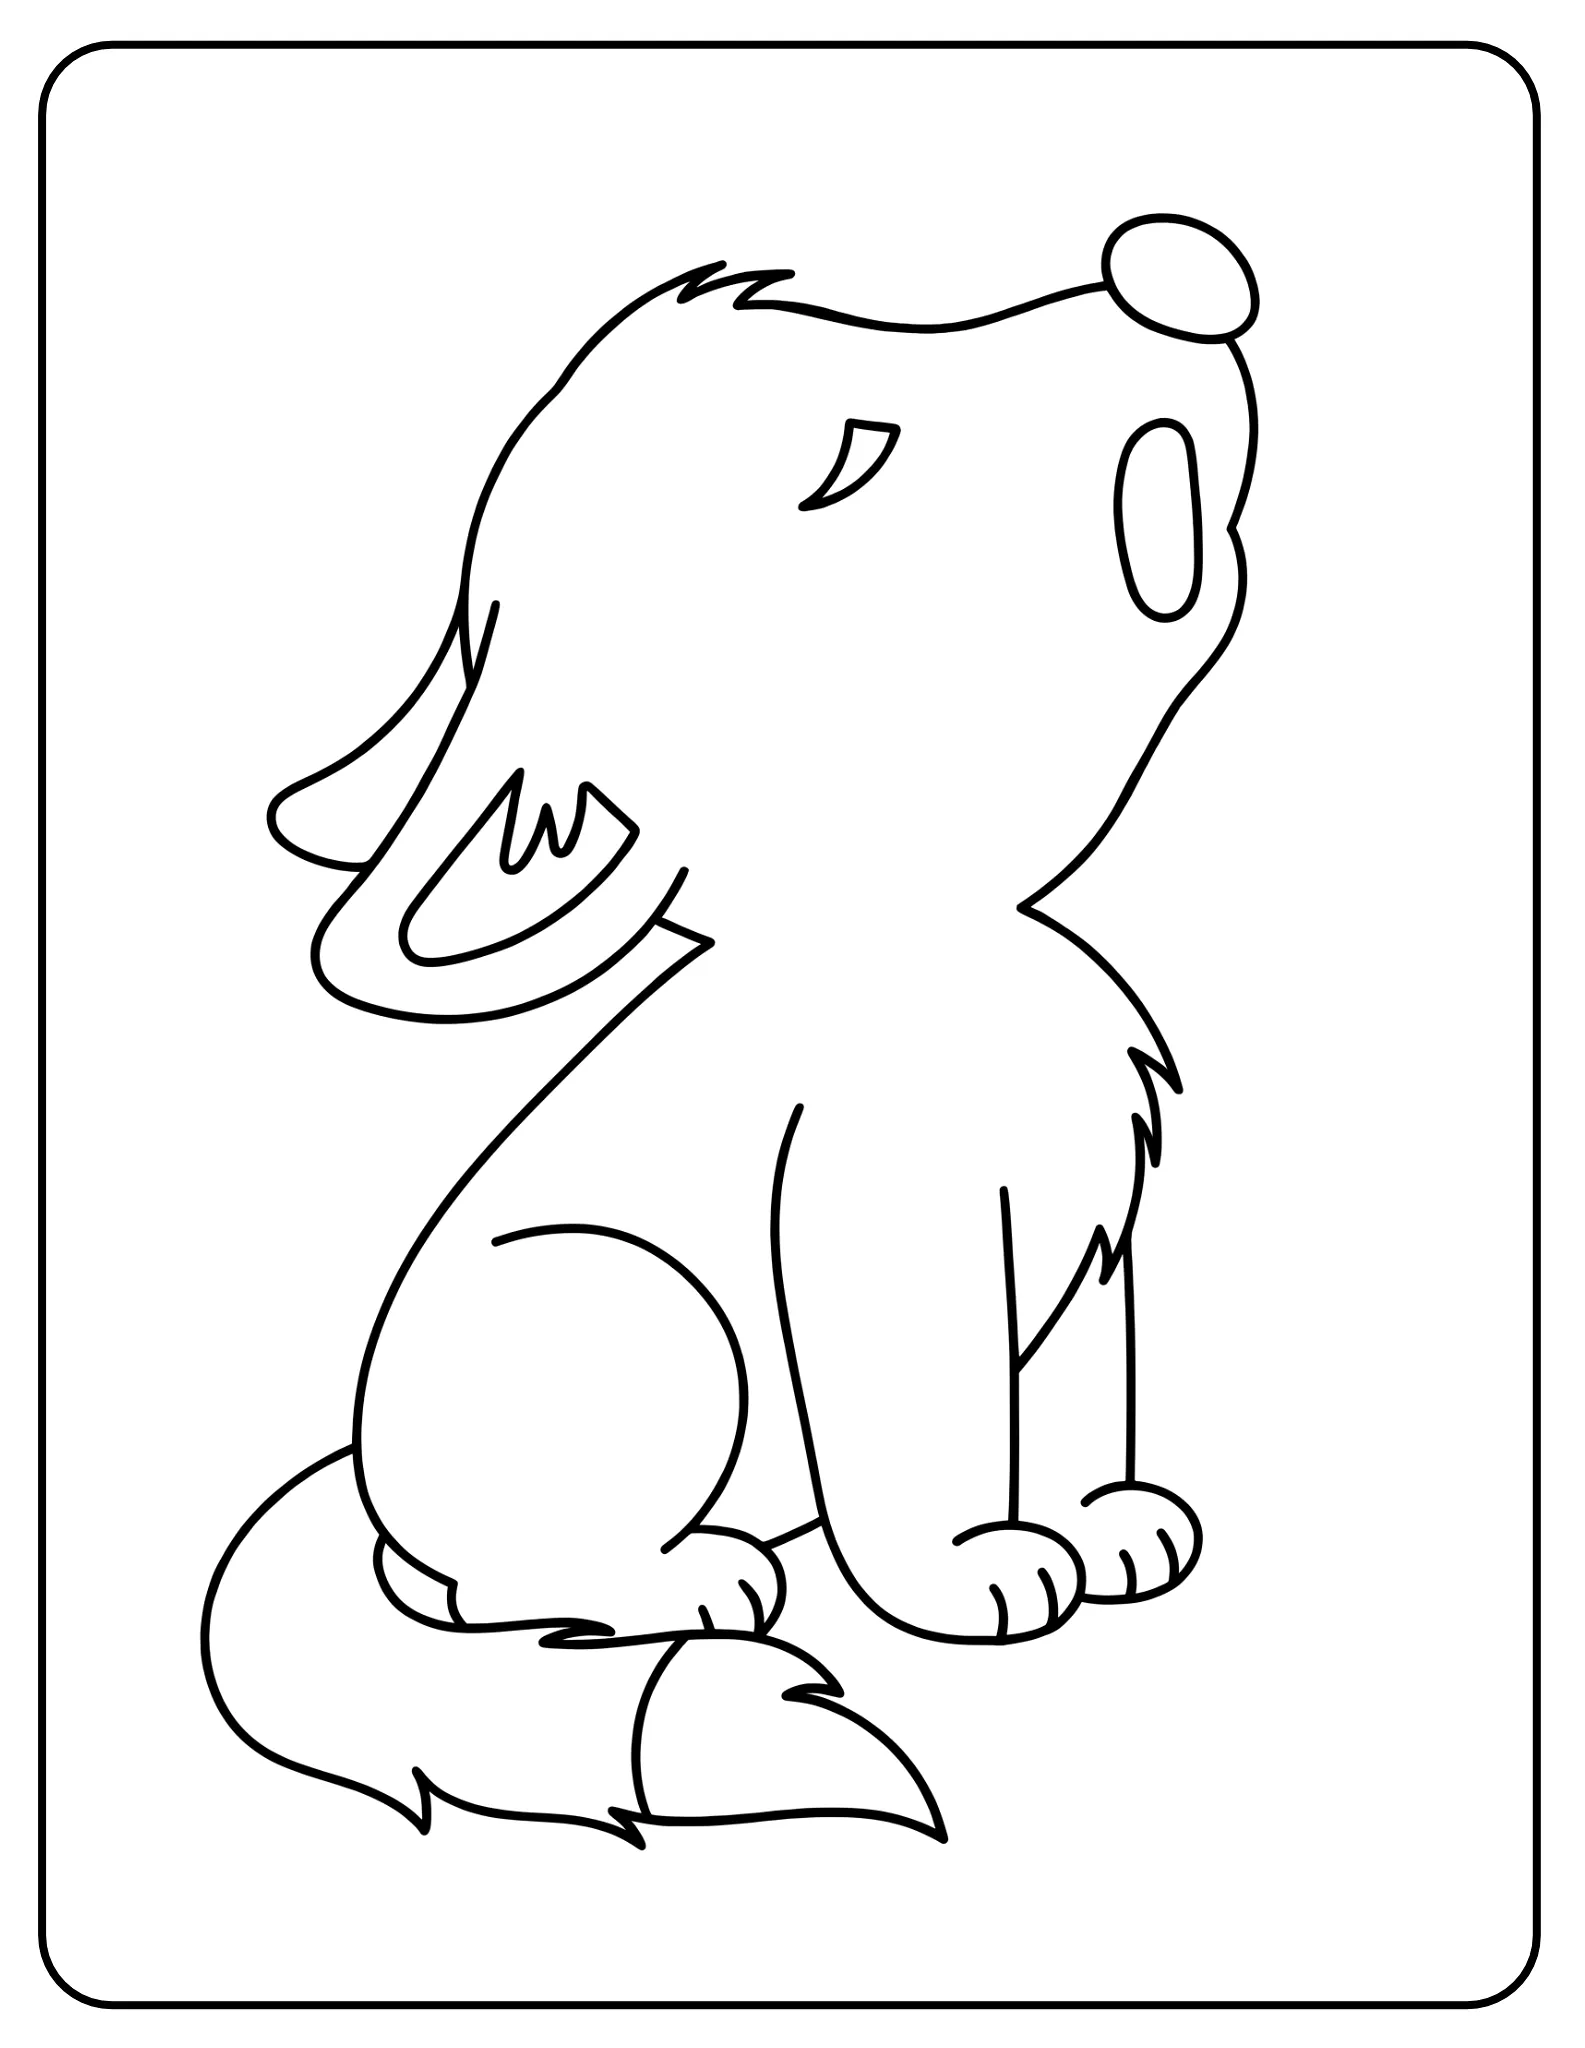
Printable Wolf Drawing PDF & Book
Black-and-white printable wolf drawing outline showing a sitting wolf howling with its head raised, pointed ears, open mouth, fluffy neck fur, rounded paws, and a large bushy tail, ready for kids to color.
Frequently Asked Questions About Drawing Wolves
How do you draw a wolf easily for beginners?
Start by drawing a circle for the head and an oval shape for the body. Use simple, curved lines to add the legs, pointed ears, a long snout, and a bushy tail. Finally, complete the drawing by adding the eyes, nose, mouth, details of the fur, and color. Taking it one small step at a time makes creating a drawing much easier.
How can kids draw a howling wolf?
To depict a howling wolf, position its muzzle (the front part of the snout) pointing upward, with an open mouth beneath it. Keep the ears pointed, and show the neck slightly extended. The seated posture and bushy tail make this pose easy to recognize, even in a very simple sketch.
What colors should I use for a wolf drawing?
Grey, brown, black, cream, and white are excellent choices for giving a wolf a natural look. The fur of many grey wolves actually incorporates several of these colors. For a creative drawing, children can experiment with blue, purple, or other imaginative colors.
How do you make a wolf drawing look realistic?
Pay attention to the wolf’s proportions: a long muzzle, erect ears, strong legs, and thick fur. Use small pencil strokes that follow the direction of the fur. Applying deeper shading beneath the neck, around the tail, and along the underside of the body can give the wolf a more three-dimensional appearance.
Can I print the wolf drawing steps?
Yes! Use the printable ‘Wolf Drawing’ PDF book provided above to follow the illustrated, step-by-step lesson. This printed guide is useful for classroom activities, homeschooling, and independent drawing practice. You can pause at each step and compare your sketch with the example.
Your Howling Wolf Drawing Is Complete!
Look at what you’ve created! Using just a few basic shapes and some careful details, you’ve learned how to draw a wolf in simple steps, from its pointed ears and raised snout to its bushy tail and small paws.
Remember, every artist has to start somewhere. Try drawing your wolf again, experiment with new colors, or create an entire forest scene under a full moon.
Ready for another animal-drawing adventure? Check out our tutorial on how to draw a fox, and keep building your collection of woodland animal drawings!
Did you color your wolf gray, brown, white, or something completely different? Share your favorite idea in the comments!
Bring Every Imagination to Life
Premium Coloring Books & Instant Digital Printables
Transform your creative vision into high-quality, personalized coloring products perfect for gifts, education, or special events. Our team of illustrators crafts unique designs tailored to your exact needs.